ToBid SDK - Unity 入门指南
Getting Started with ToBid SDK - Unity
注意: 由于Unity插件更改了结构,且开始使用PlayServicesResolver第三方库管理工具,如果之前您已经使用了2.14.0之前的版本,在您使用2.14.0版本导入前请先移除之前导入的库。由于现在使用第三包管理工具,iOS使用Cocoapods,如果您还未安装Cocoapods环境,请参考Cocoapods官方教程
Note: Since the Unity plugin has changed its structure and started using the PlayServicesResolver third-party library management tool, if you have used a version before 2.14.0, please remove the previously imported library before importing the 2.14.0 version. Since the third-party package management tool is now used, iOS uses Cocoapods. If you have not installed the Cocoapods environment, please refer to the official [Cocoapods](https://guides.cocoapods.org/using/getting-started.html#getting-started tutorial
如果作为聚合接入且接入了Google AdMob SDK,需要在info.plist 添加GADApplicationIdentifier字段,value为AppId,
<key>GADApplicationIdentifier</key><string>申请的admob的appid</string>,具体请参考Google AdMob 文档:https://developers.google.com/admob/ios/quick-startIf you use it as an aggregation and connect to the Google AdMob SDK, you need to add the GADApplicationIdentifier field in info.plist, with the value being AppId.
<key>GADApplicationIdentifier</key><string>申请的admob的appid</string>For details, please refer to the Google AdMob documentation: https://developers.google.com/admob/ios/quick-start
来自Google文档参数,仅做参考。
From Google document parameters, for reference only.
<key>GADApplicationIdentifier</key>
<string>ca-app-pub-3940256099942544~1458002511</string>
步骤 1:使用 ToBid Unity 插件设置 Unity 项目
Step 1: Set up a Unity project using the ToBid Unity plugin
将 ToBid Unity 插件添加到 Unity 项目中
Add the ToBid Unity plugin to your Unity project
在 Unity 中打开您的项目,双击下载的 ToBid-XXX.unitypackage 文件以将 ToBid Unity 插件添加到您的应用程序。当“导入 Unity 程序包”窗口打开时,如果您需要导入全部渠道,点击“全部”即可选择全部,然后导入。如果需要删除部分渠道,请在导入时在Mediation中勾选需要导入的渠道即可。
Open your project in Unity and double-click the downloaded ToBid-XXX.unitypackage file to add the ToBid Unity plugin to your application. When the "Import Unity Package" window opens, if you need to import all channels, click "All" to select all and then import. If you need to delete some channels, just check the channels you need to import in Mediation when importing.
在构建设置中选择面向的正确平台。
Select the correct platform you are targeting in the build settings.
为避免后续步骤中的编译错误,请确保项目的**“构建设置”(cmd + Shift + B)** 选择面向的是 iOS 或 ** Android ** 平台。
To avoid compilation errors in the following steps, make sure your project's Build Settings (cmd + Shift + B) targets iOS or Android .
步骤 2:集成环境相关配置
Step 2: Integration environment related configuration
在本演练中,我们初始化了附属于主**“游戏对象”**的脚本中的所有 ToBid 相关代码。您可以从任何您认为合适的脚本中调用 ToBid Unity 插件。
In this walkthrough, we initialized all ToBid related code in a script attached to the main GameObject. You can call the ToBid Unity plugin from any script you see fit.
Android相关配置
Android configuration
Unity 2019及以上版本配置说明
Configuration instructions for Unity 2019 and above
1、gradle配置
gradle configuration
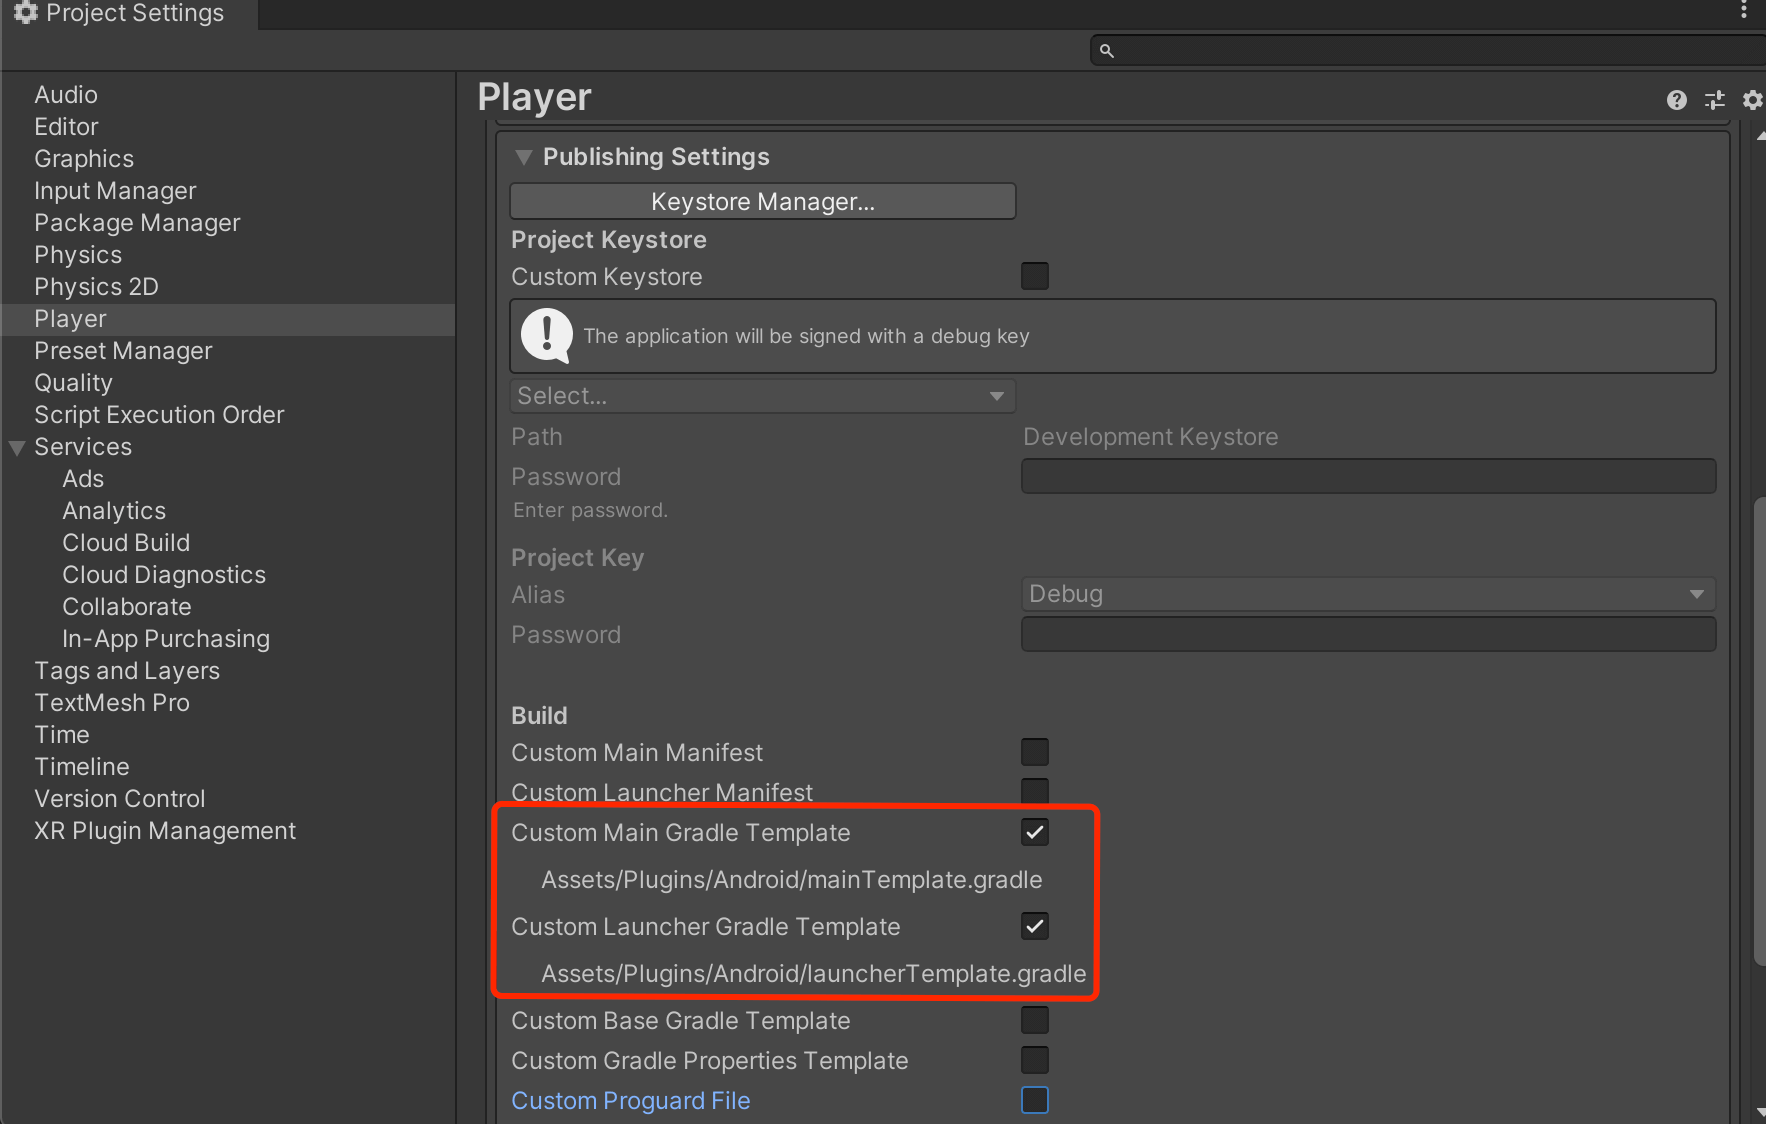
按照下图,生成launcherTemplate.gradle和mainTemplate.gradle文件
Generate launcherTemplate.gradle and mainTemplate.gradle files according to the following figure
注意:Unity2019版本针对生成后的mainTemplate.gradle需增加以下配置:
Note:Unity2019 version needs to add the following configuration to the generated mainTemplate.gradle:
注意:Unity2020版本针对生成后的launcherTemplate.gradle需增加以下配置(mainTemplate.gradle不需要此操作,但需要生成):
Note:Unity2020 version needs to add the following configuration to the generated launcherTemplate.gradle (mainTemplate.gradle does not require this operation, but needs to be generated):
android {
    ......
    defaultConfig {
        applicationId '**APPLICATIONID**'
        ......
        versionCode **VERSIONCODE**
        versionName '**VERSIONNAME**'

        multiDexEnabled true //添加此配置,是为了当代码行数超过64k的时候设置的
    }
    ......
}
2、 Unity 2020 中缺少 ToBid Android 配置文件
The ToBid Android configuration file is missing in Unity 2020
为了支持无法自定义 Gradle 构建的 Unity 版本, ToBid SDK 要把 Assets/Plugins/Android/ToBid/ 打包到 Android 构建中的 Android 资源中。
To support Unity versions that cannot customize Gradle builds, the ToBid SDK packages Assets/Plugins/Android/ToBid/ into the Android resources in the Android build.
在 Unity 2020 以上中,所有 Android 资源都必须位于带有 .androidlib后缀的目录中。如果您的项目使用生成 Assets/Plugins/Android/ToBid 目录的 ToBid 资源文件,请将其重命名为 Assets/Plugins/Android/ToBid.androidlib.
In Unity 2020 and above, all Android resources must be located in a directory with the .androidlib suffix. If your project uses the ToBid resource files generated in the Assets/Plugins/Android/ToBid directory, rename it to Assets/Plugins/Android/ToBid.androidlib.
3、AndroidX配置
AndroidX Configuration
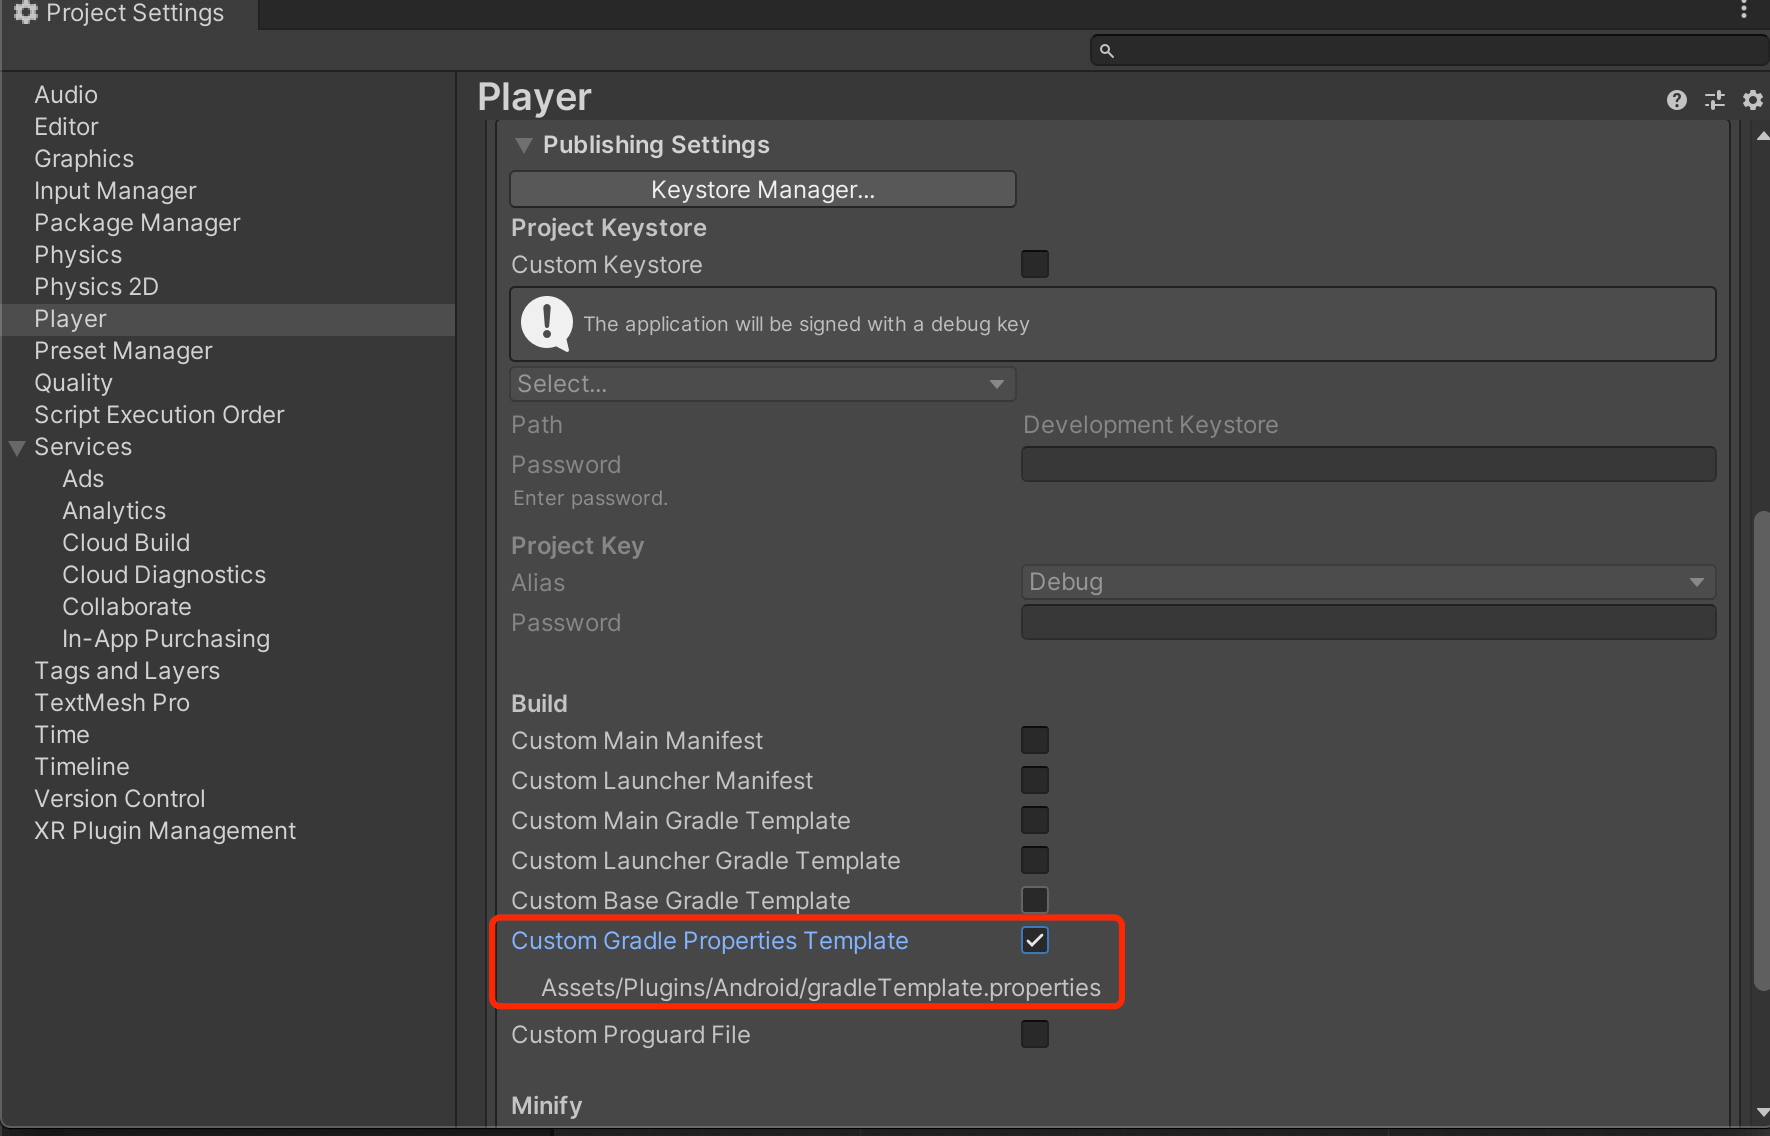
按照下图,生成gradleTemplate.properties文件。
Generate the gradleTemplate.properties file as shown below.
注意:针对生成后的gradleTemplate.properties需增加以下配置:
Note:The following configuration needs to be added to the generated gradleTemplate.properties:
org.gradle.jvmargs=-Xmx**JVM_HEAP_SIZE**M
org.gradle.parallel=true
**ADDITIONAL_PROPERTIES**

//添加以下配置
android.enableJetifier=true
android.useAndroidX=true
1.1 AndroidManifest.xml 权限内容
AndroidManifest.xml permission content
 <!--SDK 所需要权限-->
<uses-permission android:name="android.permission.INTERNET" />
<uses-permission android:name="android.permission.ACCESS_NETWORK_STATE" />

<!--SDK 国内所需要权限-->
<uses-permission android:name="android.permission.ACCESS_WIFI_STATE" />
<uses-permission android:name="android.permission.READ_PHONE_STATE" />
<uses-permission android:name="android.permission.ACCESS_COARSE_LOCATION" />
<uses-permission android:name="android.permission.CHANGE_WIFI_STATE" />
<uses-permission android:name="android.permission.ACCESS_FINE_LOCATION" />
<!-- 集成了Vungle务必添加replace -->
<uses-permission
    android:name="android.permission.WRITE_EXTERNAL_STORAGE"/>
<!--targetSDKVersion >= 26时才需要添加这个权限。-->
<uses-permission android:name="android.permission.REQUEST_INSTALL_PACKAGES" />
1.2 添加 AndroidManifest.xml Provider内容
Add AndroidManifest.xml Provider content
<provider
    android:name="com.bytedance.sdk.openadsdk.TTFileProvider"
    android:authorities="${applicationId}.TTFileProvider"
    android:exported="false"
    android:grantUriPermissions="true">
    <meta-data
        android:name="android.support.FILE_PROVIDER_PATHS"
        android:resource="@xml/file_paths" />
</provider>

<provider
    android:name="com.bytedance.sdk.openadsdk.multipro.TTMultiProvider"
    android:authorities="${applicationId}.TTMultiProvider"
    android:exported="false" />

<!-- GDT -->
<provider
    android:name="com.qq.e.comm.GDTFileProvider"
    android:authorities="${applicationId}.gdt.fileprovider"
    android:exported="false"
    android:grantUriPermissions="true">
    <meta-data
        android:name="android.support.FILE_PROVIDER_PATHS"
        android:resource="@xml/gdt_file_path" />
</provider>

<provider
    android:name="com.tencent.klevin.utils.FileProvider"
    android:authorities="${applicationId}.klevin.fileProvider"
    android:exported="false"
    android:grantUriPermissions="true">
    <meta-data
        android:name="android.support.FILE_PROVIDER_PATHS"
        android:resource="@xml/klevin_provider_paths" />
</provider>
1.3 添加 AndroidManifest.xml 第三方库配置内容
Add third-party library configuration content to AndroidManifest.xml
<uses-sdk tools:overrideLibrary="com.bun.miitmdid,com.unity3d.ads" />
<uses-library
    android:name="org.apache.http.legacy"
    android:required="false" />
1.4 添加 AndroidManifest.xml UnityPlayerActivity开启hardwareAccelerated
Add AndroidManifest.xml UnityPlayerActivity to enable hardwareAccelerated
<activity
    android:name="com.unity3d.player.UnityPlayerActivity"

    android:hardwareAccelerated="true"

    android:configChanges="fontScale|keyboard|keyboardHidden|locale|mnc|mcc|navigation|orientation|screenLayout|screenSize|smallestScreenSize|uiMode|touchscreen"
    android:label="@string/app_name">
    <intent-filter>
        <action android:name="android.intent.action.MAIN" />
        <category android:name="android.intent.category.LAUNCHER" />
    </intent-filter>
</activity>
iOS添加相关依赖库
Add related dependency libraries to iOS
可在unity build时写脚本自动配置iOS工程,示例代码如下(仅供参考):
You can write a script to automatically configure the iOS project during Unity build. The sample code is as follows (for reference only):
public class XcodeProjectUpdater {

	[PostProcessBuild]
	public static void OnPostprocessBuild(BuildTarget target, string pathToBuildProject) {

		if (target != BuildTarget.iOS) return;
		//.xcodeproj的路径
		string projPath = PBXProject.GetPBXProjectPath(pathToBuildProject);
		PBXProject proj = new PBXProject();
		proj.ReadFromString(File.ReadAllText(projPath));

		string buildTarget = proj.TargetGuidByName("Unity-iPhone");

		//---------------------
		//1、修改设置
		//添加系统库
		proj.AddFrameworkToProject(buildTarget,"CoreTelephony.framework", false);
		proj.AddFrameworkToProject(buildTarget,"Security.framework", false);
        proj.AddFrameworkToProject(buildTarget,"CoreLocation.framework", false);
		proj.AddFrameworkToProject(buildTarget,"MobileCoreServices.framework", false);
		proj.AddFrameworkToProject(buildTarget,"StoreKit.framework", false);
		proj.AddFrameworkToProject(buildTarget,"AdSupport.framework", false);
		proj.AddFrameworkToProject(buildTarget,"ImageIO.framework", false);
		proj.AddFrameworkToProject(buildTarget,"SafariServices.framework", true);
		proj.AddFrameworkToProject(buildTarget,"WebKit.framework", true);

		//---------------------

		//添加tbd
		string fileGuidSqlite = proj.AddFile("usr/lib/libsqlite3.0.tbd", "Libraries/libsqlite3.0.tbd", PBXSourceTree.Sdk);
		proj.AddFileToBuild(buildTarget, fileGuidSqlite);

		string fileGuidLibz = proj.AddFile("usr/lib/libz.tbd", "Libraries/libz.tbd", PBXSourceTree.Sdk);
		proj.AddFileToBuild(buildTarget, fileGuidLibz);

		string fileGuidLibc= proj.AddFile("usr/lib/libc++.tbd", "Libraries/libc++.tbd", PBXSourceTree.Sdk);
		proj.AddFileToBuild(buildTarget, fileGuidLibc);
		//---------------------

		//修改属性
		proj.SetBuildProperty(buildTarget,"ENABLE_BITCODE", "YES");
		proj.AddBuildProperty(buildTarget, "OTHER_LDFLAGS", "-ObjC");

		//---------------------
        //info.plist
        string plistPath = pathToBuildProject + "/Info.plist";
        PlistDocument plist = new PlistDocument();
        plist.ReadFromString(File.ReadAllText(plistPath));
        // Get root
        PlistElementDict rootDict = plist.root;

        /* iOS9所有的app对外http协议默认要求改成https */
            // Add value of NSAppTransportSecurity in Xcode plist
            var atsKey = "NSAppTransportSecurity";
        PlistElementDict dictTmp = rootDict.CreateDict(atsKey);
            dictTmp.SetBoolean("NSAllowsArbitraryLoads", true);
            rootDict.SetString("NSLocationWhenInUseUsageDescription", "是否允许使用定位权限");
        rootDict.SetString("CFBundleDevelopmentRegion", "China");


            File.WriteAllText (projPath, proj.WriteToString());

	}
}
oaid相关配置
oaid configuration
建议开发者优先集成OAID。Android 10 无法通过常规方式获取IMEI,影响广告测试及正式广告的填充。
**It is recommended that developers integrate OAID first. Android 10 cannot obtain IMEI through conventional methods, which affects advertising testing and official advertising filling. **
MSA联盟官网地址: http://www.msa-alliance.cn/col.jsp?id=120
MSA Alliance official website address: http://www.msa-alliance.cn/col.jsp?id=120
2.20 版本后,支持 MSA 1.0.22 版本
After version 2.20, support MSA version 1.0.22
1、把 msa_mdid_x.x.x.aar 或者 oaid_sdk_x.x.x.aar 拷贝到项的 libs 目录,并设置依赖,其中 x.x.x 代表版本号。
Copy msa_mdid_x.xxaar or oaid_sdk_x.xxaar to the libs directory of the project and set the dependency, where xxx represents the version number.implementation files('libs/msa_mdid_x.x.x.aar') 或者 implementation files('libs/oaid_sdk_x.x.x.aar')2、将 supplierconfig.json 拷贝到项目 assets 目录下,并修改里边对应内容,特别是需要设置 appid 的部分。需要设置 appid 的部分需要去对应厂商的应用商店里注册自己的app。
Copy supplierconfig.json to the project assets directory and modify the corresponding content, especially the part that needs to set the appid. The part that needs to set the appid needs to register your own app in the corresponding manufacturer's app store.3、混淆设置。
Confusion settings.
-keep class com.bun.** {*;}
-dontwarn com.bun.**

-keep, includedescriptorclasses class com.asus.msa.SupplementaryDID.** { *; }
-keepclasseswithmembernames class com.asus.msa.SupplementaryDID.** { *; }
-keep, includedescriptorclasses class com.asus.msa.sdid.** { *; }
-keepclasseswithmembernames class com.asus.msa.sdid.** { *; }
-keep public class com.netease.nis.sdkwrapper.Utils {public <methods>;}
-keep class com.samsung.android.deviceidservice.**{*;}
-keep class a.**{*;}- 4、设置 gradle 编译选项,这块可以根据自己对平台的选择进里合里配置。
Set the gradle compilation options, which can be configured according to your choice of platform.
ndk {
    abiFilters 'armeabi-v7a','x86','arm64-v8a','x86_64','armeabi'
}
packagingOptions {
    doNotStrip "*/armeabi-v7a/*.so"
    doNotStrip "*/x86/*.so"
    doNotStrip "*/arm64-v8a/*.so"
    doNotStrip "*/x86_64/*.so"
    doNotStrip "armeabi.so"
}
android混淆配置说明
Android obfuscation configuration instructions
# 不优化输入的类文件
-dontoptimize
#忽略警告
-ignorewarnings

# WindMillAd
-dontwarn com.sigmob.**
-keep class com.sigmob.**{ *;}
-keep interface com.sigmob.**{ *;}

-dontwarn com.czhj.**
-keep class com.czhj.**{ *;}
-keep interface com.czhj.**{ *;}
-keep class com.tan.**{ *;}

-dontwarn com.windmill.**
-keep class com.windmill.**.**{*;}
-keep interface com.windmill.**{ *;}

# miitmdid
-dontwarn com.bun.**
-keep class com.bun.** {*;}
-keep class a.**{*;}
-keep class XI.CA.XI.**{*;}
-keep class XI.K0.XI.**{*;}
-keep class XI.XI.K0.**{*;}
-keep class XI.vs.K0.**{*;}
-keep class XI.xo.XI.XI.**{*;}
-keep class com.asus.msa.SupplementaryDID.**{*;}
-keep class com.asus.msa.sdid.**{*;}
-keep class com.huawei.hms.ads.identifier.**{*;}
-keep class com.samsung.android.deviceidservice.**{*;}
-keep class com.zui.opendeviceidlibrary.**{*;}
-keep class org.json.**{*;}
-keep public class com.netease.nis.sdkwrapper.Utils {public <methods>;}